Supplies for Nature Notebooking
Editor’s note: This is the third in a series of original articles by Nicole Handfield on the topic of keeping a nature notebook.
In my first article on nature notebooks, I invited you to enter with open heart and eyes into God’s Out-of-Doors. In my next article I explained how to expand your nature notebooking experience in phases. For this third article in the series, I have teamed up with Art Middlekauff to talk about supplies for observing nature and capturing it in the nature notebook. While our goal in nature study is not to create beautiful museum pieces like we see in The Country Diary of an Edwardian Lady, nevertheless it is important that we write and draw something. To have the fullest encounter with nature, we need to not only take it all in; we also need to write something out. Having the right supplies can make that easier.
When I first started my nature notebook journey, I had no idea what to buy, so I ended up frustrated after wasting a lot of money. I would like to save you from that same frustration and expense. But honestly, I could discuss the pros and cons of nature notebook supplies for several days. There are so many variables and I don’t know your specific situation. I want to be helpful, but I think the best way I can do that is to simply explain what we use in my family and in my classes, with just a little discussion about the reasons why. After that, at least to some degree, you’ll have to figure out what works best for you.
One theme you will notice in my recommendations is quality. Low-quality supplies can frustrate you and your children because they just don’t function consistently. And I don’t want you to give up because you think you can’t do this, when it’s really just a supply problem. I encourage you to get the best (artist-grade) you can comfortably afford and avoid “student” quality if you possibly can.
Notebook
Not surprisingly, the foundational element in your nature notebook supply kit is the notebook itself. When we think about what makes for a good notebook, it is helpful to look back at the history of the nature notebook in Charlotte Mason’s House of Education. About a year ago, Art Middlekauff had the opportunity to examine some actual student notebooks at the Armitt Museum in Ambleside. Here’s what he found.
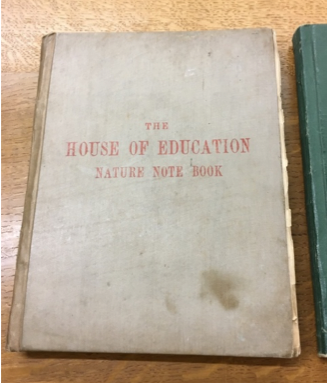 When I opened the box in the Armitt archive that contained the actual student nature notebooks from Charlotte Mason’s teacher training college, the first thing I noticed was the official lettering embossed on the tan cover: “The House of Education Nature Note Book.” I was struck with the thought that this was no random or ad hoc design. The leadership of the House of Education had obviously put some thought into how a nature notebook should be assembled. I wondered if perhaps Charlotte Mason herself had determined the design characteristics. I looked at three notebooks, and all had the exact same dimensions: 7” x 9”. The letters on the green cover of the second notebook read, “House of Education Students’ Nature Notebook,” while the third simply read, in the same embossed lettering, “Nature Note Book / Interleaved.”
Later study confirmed my intuition that Mason herself had indeed designed the notebook. In volume 34 of The Parents’ Review we read:
In founding the House of Education in Ambleside, it was Miss Mason’s intention that her students should become familiar with these beauties of Nature; and the Nature Note Book, which she designed, is the symbol of their knowledge: that precious green book with its red title, “House of Education, Students’ Nature Note Book” which is the peculiar privilege of the student.
The inside of the book is nothing more than good drawing paper (for painting, without pencil outlines) until the possessor begins to make it the record of her own observations. (Drury, 1923, p. 370)
But it turns out that at one time there was no standard design for the notebook, and variety reigned. Herbert Geldart writes:
The way in which the present form of Ambleside Nature Note-Book, with which no doubt many of us are acquainted, came to be adopted was, that in the early time there was much difference in the books used; some were large, some small; some had excellent paper, some very inferior, into which the colours sank, leaving ragged outlines; the only point in which they almost all agreed was, in being badly bound. This bad quality of paper caused a good deal of trouble in placing some of the books, because allowance had to be made for the material used. All these things being brought under notice, the House of Education provided the present pattern, which has excellent paper, good for painting upon, is firmly bound, and puts all the students on an equality, and will last, as books on which so much care and labour have been spent should do, for many years, and it is very cheap. I am told that these books are a very great success, and very largely used by others besides the students.*
* Nature Note-Books may be had at the Office—1s. (Geldart, 1898, p. 491)
The third notebook I saw was probably one of these earlier versions, as it had the matching title: “Nature Note-book.” I find it interesting that the standard dimensions of 7”x9” were maintained over time. An interesting book review in volume 15 of The Parents’ Review described yet another design feature of some nature notebooks:
The Eton Nature-Study Note Book designed by Wilfred Mark Webb, F.L.S. (Spottiswoode & Co., Eton College, 3/6). This is the perfection of a Nature Note Book, made of double paper—a blank page of cartridge for drawing on the one side and a ruled page for writing on the other. The cover of charming green linen is so arranged that new sheets can be added; in fact we have here a perfect Nature Note Book. (PNEU, 1904, p. 154)
The writer of the book review is not specified, which leads me to believe it was Charlotte Mason, who was the General Editor of The Parents’ Review at that time. It is obvious to me why the reviewer liked the idea of having blank pages alternating with ruled pages; Charlotte Mason’s model for nature notebooking involved a concept of brush drawings and diary-like journal entries. In fact, of the three notebooks I saw at the Armitt, one of them followed this exact design:
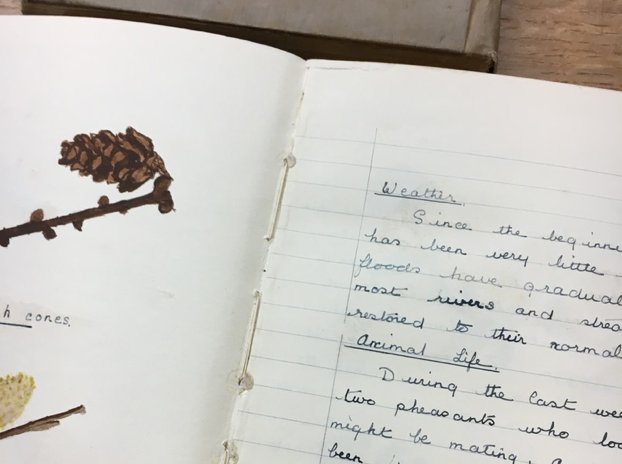
This was the third notebook, with the cover title “Nature Note Book / Interleaved.” It is not clear to me why this design was not fully embraced; for some reason the “House of Education” official notebooks contained only blank pages:

All three sample notebooks (dated 1896, 1910, and 1925) contained roughly the same number of pages, containing between 87 and 99 leaves of paper (for a total of 174 to 198 writable pages).
As Geldart noticed as early as 1898, a poorly constructed nature notebook can take the joy out of nature study. I think it is important to take the time to find the right notebook. Here are my bottom-line notebook guidelines regardless of the brand:
1. A sewn binding with a flexible spine will allow your notebook to lie flat. A glued binding means that pages will eventually fall out if the book is opened to lie flat. I personally do not care for spiral binding on the nature notebook, and of course the House of Education notebooks did not have spiral binding either. I think there is a temptation for beginners to want something with perforated pages or a spiral binding so that they can rip out anything that’s not “good.” (Or maybe that was just me.) After reading a lot more about it, I realized that I was missing the point of the nature notebook entirely! Even professional artists aren’t happy with every piece; we are doing this for the process more than for the product. And we can learn something from every painting session. My favorite structure is a sewn binding. Even with a sewn binding, though, some notebooks will not lie flat because of a stiff hardcover spine—think about some of your favorite hardcover books. It is possible to find nature notebooks with very soft spines and sewn bindings in order to open completely flat while painting.
2. Size is also important. In my experience, children can get overwhelmed with a large page for the nature notebook, so I like to start Form I and II students with a 5” x 8” book. For my own nature notebook, I am happy to use anything from a 5” x 7” to a 8”x12”.
3. The paper needs to be thick enough to handle watercolor without buckling and without showing through to the back of the page. While you can get away with using multimedia paper, watercolor paper contains sizing, which keeps the paint on top of the paper. I recommend starting with a basic weight watercolor paper (140 lb) but you could even use a thicker watercolor paper (300 lb). Quality paper is more expensive but it accepts the watercolor better, so keep that in mind, especially for beginners. If you use a thinner-weight paper, you may experience some bleeding through to the back of the page, but you could just use one side of each double-page spread. There are other variables with paper—cold (bumpy) vs. hot (smooth) press, opacity, curling, and how the paint interacts with the paper—so try a bunch of different papers to find out what you like best.
I like to use Stillman & Birn softcover notebooks because they meet all three of my criteria. The sewn binding combined with a soft spine allows them to lie perfectly flat, the sizes work great, and the paper is really nice. I appreciate the beauty in the symmetry of matching notebooks, so it makes me happy to see several of these lined up on my shelf. The Alpha has 46 sheets (92 pages), while still providing a decent 100 lb. paper. My daughter is using the Stillman & Birn softcover Alpha in the smaller 5.5”x8.5” for her nature notebook.
I used the 8”x10” Stillman & Birn softcover Alpha for my nature notebook during 2018, but I found that with my painting style, the 100 lb paper occasionally started to shred and it clumped in my painting. This might not affect everyone, but I wanted to find something better. The Stillman & Birn softcover Zeta uses thicker paper (180 lb.), which is a big step up from the Alpha, but it only comes with 26 sheets (52 pages) in one book. It makes sense; thicker paper is bulkier. This would be fine if you don’t mind using more than one notebook in a year, or if you only paint once a week and you don’t mind painting on both sides of the paper. I have a Stillman & Birn softcover Zeta that I planned to use for 2019, but I haven’t started using it yet. I would recommend the Zeta over the Alpha because the paper is thicker, but I really think both are great notebooks.
For about five years now I have been struggling to find the perfect nature notebook for me that has paper that I love. My absolute favorite watercolor paper is cold press Arches Aquarelle 140 lb. 100% cotton rag, but it’s expensive. You can buy it in pads, but in the past, I was unable to find any notebooks made with Arches (or any other brand) 100% cotton paper. However, I recently discovered handmade notebooks made with Arches watercolor paper on Etsy. I ordered the Sketchbook, Arches 140lb Cold Press, Handmade, Large size from NatureSketches (24 Arches sheets and 6 sheets of smooth Bristol paper) and Watercolor Journal A5 from LkMichiganBookPress (32 sheets). Even though I haven’t had a chance to thoroughly try them out yet, I heartily recommend them both because I know how well the Arches paper performs. Both books have sewn bindings with flexible spines so that they lie completely flat when opened, and they both appear to be very well-made.
Brushes and Watercolors
OK, so you found a notebook with really great paper, it’s just the right size, and it opens totally flat — now you need a brush. I think I can honestly say that I have tried all the brushes! A good watercolor brush is an investment, but if you take care of it (and you definitely should take the time to learn how to do that), it will serve you well for many years. We typically use a #6 or a #8 Escoda Reserva Kolinsky Tajmyr Barcelona, #8 Silver Black Velvet 3000S Round, or a #6 Golden Maple. I would recommend any of these brushes for brush drawing lessons or indoor nature notebook painting; but I would not recommend brushes from craft stores, or brushes that come with paint sets.
Now let’s talk about brands of pigment. I mostly use tubes of watercolor from Daniel Smith, but I have a few tubes from Winsor & Newton and a couple of half-pans from Greenleaf & Blueberry. I also use a Mini Mister, which is a small spray bottle that fits inside my paint palette. I spray my paints before I get started, which softens them and makes it easier to get a lot of pigment on my brush. I don’t want to discuss specific colors just yet, because first I need to explain a bit about color theory, which I plan to do in a future article. Suffice to say, I start with recommendations from artists I admire and go from there.
Let’s not forget about the nature notes. We don’t just describe what we observe in pictures; we also narrate what we observe in words. For this, I typically write my notes lightly with my very favorite mechanical pencil. Then I decide if I like the way the page is filled up, and assess word choice. Then I write over the notes in pen, when I know I won’t run out of room or have an awkward gap. Most of the time, I don’t know the name of the specimen right away, so I leave a space for the common name (which I like to write in modern calligraphy with a split-nib dipped in black ink) and the Latin name (which I write below the common name in basic cursive).
Lenses
One of the major goals of nature notebooking is to increase our habit of observation of nature. Not everything we observe in nature can be completely observed with the naked eye. This was recognized in the PNEU days, as Agnes Drury talked about magnifying with a “hand lens” in her 1941 Parents’ Review article entitled “How to Keep a Nature Note-Book.” I sometimes find it useful to use lenses to magnify specimens, but frankly I have not found the perfect device yet. So I use several!
One lens that I often reach for is my BelOMO 10x Triplet Loupe Folding Magnifier. Honestly, I do find a jeweler’s loupe kind of difficult to use. However, you can make it work if you bring the loupe and the specimen pretty close to your eye. It helps if you hold the loupe with one hand that is also touching a part of your face, for stability. Then touch your hands (one holding the loupe and one holding the specimen) together, again for stability. Then, still touching your hands together, move the object slowly closer or farther from the loupe until you get a clear image. There are helpful videos on YouTube which show how this is done. The jeweler’s loupe is challenging for a moving specimen, but if you can figure out how to use it properly, it’s great for something still like a rock.
Another magnification device I use is the Carson MicroBrite Plus 60x-120x Power LED Lighted Pocket Microscope (MM-300). This is a handheld microscope that actually works really well. It comes with a hood and a built-in light, which can be really helpful. However, the light sometimes distorts the colors. We’ve really enjoyed exploring pond water critters on glass slides with these.
I also have a very simple Carson LumiLoupe Series Pre-Focused Stand Magnifier Loupe (LL-10). This is great because the built-in hood makes it easy for younger children to focus while also letting plenty of light in. I think young children would have more success with this lens than the two I discussed above.
Art will now share about another category of lenses!
A different kind of magnification is needed when we are observing birds, and you never know when a nature walk will turn into a bird walk. Agnes Drury observed this in 1923:
There is a delightfully casual element in Nature Walks. We simply choose which way to go and then “’Nature” does the rest because Ambleside is an unrivalled spot to learn in. We like to be teased when the Nature Walk lingers to watch a dipper or a grey wagtail, or the Bird Walk finds the yellow Gagea or the marsh Cinquefoil, as if we were poaching on each other’s preserves! For the fact is that we take whatever comes, and the unexpected almost always happens. (Drury, 1923, p. 371)
Since “the unexpected almost always happens,” I always like to have my binoculars on hand whenever I am out in nature. In fact, I travel with them whenever I can, especially if I might find myself in any “spot to learn in.” Christine Cooper of the House of Education explains why binoculars (field glasses) are so important for observing birds:
A pair of field-glasses are of great use in bird-stalking, and bird walks, because it is so difficult to get a clear idea of a bird’s colouring unless one is quite close to it. A good deal of time should be given to watching birds, in order to learn their habits, and if possible to know their chief food, whether it be land or water plants, or insects, or small fish. (Cooper, 1909, p. 341)
As with other supplies for nature study, there is simply no substitute for quality. Pete Dunne (“the bard of birding”) wrote that “$200 to $300 … is (with few exceptions) the least you should expect to pay for a decent, durable, birder-worthy binocular” (Dunne, 2003, p. 46). If you want to reap the benefits that Cooper describes, then I encourage you to save up for at least that amount. Dunne recommends a 7x or 8x magnification for beginners, and he says to never buy a zoom or a binocular that features a permanent or fixed focus (Dunne, 2003, p. 61). Many years ago I purchased a pair of Leupold Cascades (8×42), and I still love them to this day. I also got the Quick Release Binocular Harness which makes the field glasses easier to carry and use. Honestly, there is nothing I don’t like about them; they’ve been with me to Australia, India, and even the Seychelles. Through those lenses I was able to see several of the fewer than 1,000 Seychelles black parrots alive in the wild.
Clothing
I would also like to include a note about clothing. Charlotte Mason emphasized its importance, and proper clothing can contribute quite a bit to your enjoyment of being outdoors. I am talking, in a word, about wool. Wool is really better than polyester and many other fabrics. It is both insulating and breathable. It can get wet (and still keep you warm) as long as you change into dry clothing once you get home. In fact, Charlotte Mason would say that the only time you should wear waterproof (non-breathable) garments over your clothing is while you are out running errands, because it would not be practical to change once you get to your destination.
There are quite a few companies selling 100% merino wool knits that are machine-washable and not at all itchy. Switching to wool can significantly reduce your volume of laundry because it really takes a lot to soil wool clothing, and when properly aired out, wool tends not to retain odors. For more information on the clinically-proven benefits of wool, please see the recent article by my husband.
It is also important to have a bag to hold your nature notebook supplies in one place. Cross-body bags made for iPads work well. Generally, I think smaller is better, so that you can’t fill it up with so much stuff that it is burdensome to carry. My bag is just big enough for my nature study essentials. What are those essentials? Well, in a large part it depends on whether you plan to paint outdoors.
Painting in the Field
We know that in the era of the PNEU, the general pattern was to collect specimens during the nature walk and bring them back to the schoolroom for painting. For example, we read:
The children… keep a Nature note-book in which they record anything interesting they have noticed with regard to Nature. In it they paint specimens which they bring home from their walks. (Low, 1917, p. 674)
For younger children, I think this is the most sensible pattern. However, I would like to suggest three reasons why painting outdoors in the field can be a good idea:
1. Proper ecological stewardship requires that we be careful about removing specimens from nature. While it may be fine to bring home a leaf or a branch from the ground, it is another thing to pluck a living wildflower, especially from a state or national park. If you want to enjoy the benefits of close observation and painting some of the most beautiful forms in God’s creation, it may be necessary to paint in the field.
2. I believe that parents should keep nature notebooks and should set the example for their children. I find that with my busy life and household responsibilities, it is easier for me to get focused time painting when I am actually out in the field. It can be a restful and peaceful time of mother culture when I can both observe and paint out in nature. While my children have not yet found this same benefit, I imagine they will when they get into their teen years.
3. Charlotte Mason talks a lot about the benefit of being outdoors in fresh air. Even taking a specimen to a picnic table rather than all the way home can be a way to enjoy nature notebooking at a table while still experiencing sunshine and air.
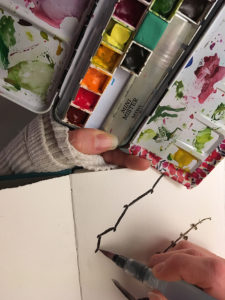 So what supplies are needed for painting in the field? The primary consideration is the brush. Brush drawing requires water, and it is extremely important not to dump water with paint residue in the wild. In order to ensure clean and safe use of water, I prefer the Pentel water brush (size large). You might think you need a variety of sizes or that a large wouldn’t allow you to paint details, but this brush (surprisingly!) comes to a delightful point and it consistently springs back. I find the flat purple Kuretake Fude brush to be useful for painting trees, but it is certainly not necessary.
When you’re out in the field, you also need a compact way to transport and access your paint. I use the Meeden metal palette. It is advertised as holding 24 half-pans, but, if you don’t want to keep your water brush in the middle, you can add 11 more half pans with Blu-Tack, bringing you up to 36 colors if you count the squirt of white gouache you can add directly on the mixing tray. That’s a lot of colors! I added six gouache colors in mine because there was so much room. One of the great things about these palettes is how easy it is to pop the half pans in and out because of the flexible metal tray. As you spend more time getting to know your paints, you may find that you like to rearrange your palette a few times a year, as I do.
Another consideration is that you typically won’t have a table out in the field, so it is handy to have an old sock with the toe cut off worn around your wrist on non-dominant hand. You can use this to wipe excess water from your brush and to clean the brush when changing colors. It is also helpful to have a piece of plain paper. This can be used to give your specimen a white background, which can help you to see the light and dark areas without distractions from the background. It can also be placed in your notebook if your page isn’t quite dry when you have to pack up and run after a toddler who’s fallen into the water. (Not that that’s ever happened to me!)
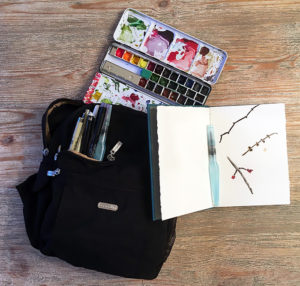 When I go out for nature study, my bag contains the following items:
- Main compartment: nature notebook, sock, and palette.
- Front pocket: a handful of pens, a pencil or two, extra (filled) water brushes, and my magnification lenses.
Of course I’m sure Art would say that I should make room for binoculars too!
I hope you find all these suggestions helpful. But I can’t emphasize enough that you should not wait for the perfect instruments before going outside into nature. The most important thing is just to get started. But if you’ve been going outside and want to make the experience better, I hope you’ve found some useful tips here.
So what’s in your nature bag? Have you found the perfect nature notebook? Do you have any experience with any of the items I’ve listed above? Do you have any specific supplies questions? Let me know in the comments!
References
Cooper, C. (1909). Nature study. In The Parents’ Review, volume 20 (pp. 337-348). London: Parents’ National Educational Union.
Drury, A. (1923). The nature work at the House of Education. In The Parents’ Review, volume 34 (pp. 369-374). London: Parents’ National Educational Union.
Dunne, P. (2003). Pete Dunne on bird watching. Boston: Houghton Mifflin Company.
Geldart, H. (1898). Nature work at the House of Education. In The Parents’ Review, volume 9 (pp. 487-494). London: Parents’ National Educational Union.
Low, E. (1917). Practical carrying out of the P.N.E.U. method. In The Parents’ Review, volume 28 (pp. 672-677). London: Parents’ National Educational Union.
PNEU. (1904). Books. In The Parents’ Review, volume 15 (pp. 151-154). London: Parents’ National Educational Union.
Nicole is the director of the In a Large Room Retreat, editor of Charlotte Mason and the Great Recognition book and art print, and co-founder of the In a Large Room Community. She and her husband Kent are raising four boisterous kids (including one with complex special needs) near Washington, DC. Nicole credits her nature notebook for her intervals of lucidity. You can follow her amateur nature notebook adventures at #keeperofglory and #insidemynaturenotebook.
©2019 Nicole Handfield and Art Middlekauff
Subscribe: Apple Podcasts | Spotify | Amazon Music
5 Replies to “Supplies for Nature Notebooking”
Great ideas, Nicole! I’m curious if you also bring a backpack when you are out in the field and keep it separate from your journaling supplies? I make a point not to go on trails without a compass, a space blanket, plenty of water, some high protein snacks, a whistle, and I think most importantly after water, a headlamp. I could see though how organizing these separately from my journaling supplies would keep them handier to quickly sit and note something.
Also a suggestion—for my early years pre-lessons kids I have found a wonderful system where we have 5×7 notecards in the field. They watercolor with the pentel brushes and when they are done I flip the card over and they tell me what they saw and I write it on the lined side. When we get home we have a 5×7 photo album and we slide the cards in. That way they can also paint as many as they want and choose their best work for the book at home.
Thanks for your comment, Joanna! I think those are excellent things to bring on a hike! With my littles and a 43-pounder in a wheelchair, our nature walks aren’t too adventurous. I’m still trying to figure out how we can manage camping. But I think your list sounds really great!
Hi Nicole,
Thank you for your article. I would just like to respectfully disagree that student grade paints aren’t good enough and actually make a case for them. At one of my first CM conferences I was introduced to brush drawing watercolor and it was so nice to know that I could get started with a $5 prang set of 8 watercolors, a size 2 brush, and a sketchbook. We have been happily painting in our nature journals with much success and beauty with our Prang set for at least 5 years. Just this past year,after almost 5 years of using Prang, since we are so devoted to our painting and wanted to add brush drawing lessons to our repertoire, I invested in very nice paints and upgraded our brushes a bit. I use these paints for our brush drawing lessons but I still use my prang set for drawing while out on nature walks and nature studies. Now, there is not doubt that my nice new box of Kuretake paints is exquisite to use at home and my children use their new travel size paints (Lukas and Winsor Newton-Cotman) when we are out. After we got our nicer paints, I continued using Prang outdoors out of convenience at first. I didn’t want to carry around my large box of nice paints. But, I will say, I can mix colors better with my simple Prang set. It may be since I have practiced so much with it and the fact that I am starting out with such basic colors it is easier to understand how to mix them than beginning with other shades of red for example.
You did mention that the most important thing is to just get started without letting not having the perfect supplies get in your way. It is so true. I just want to encourage people that Prang has consistently worked well for us and it is so affordable.
Dear Shelley, Thanks for commenting! You aren’t alone in loving the Prang sets. I was in a CM co-op several years ago and that’s what they used. I agree with your sentiment that there can be a lot of joy and beauty from this little set. And I am not at all trying to take that away. Especially for families on a super-tight budget, you really know what you can afford. I just want to encourage you to get the best that you can comfortably afford. I don’t think it’s worth going into debt, but perhaps some quality supplies could be a special birthday present from a generous relative. My kids pretty much only get clothes and school supplies for presents =) If you really want to make it work with the Prang sets, you might want to replace one or two of the color pans with some other recommended “primary mixing colors” which would improve the range of colors you can create. I would pop out the green and replace it with a squirt of a second blue. This would give you a better range for mixing greens. I remember a stunning Green Darner that I tried in vain to match with my original set of paints and my frustration turned to discouragement until I found out that you really do need different blues and that it wasn’t “operator error” to get bright greens. Check the “red” too; it might be helpful to replace that with more of a magenta. Miss Mason said, “Boxes of cheap colours are to be avoided. Children are worthy of the best, and some half-dozen tubes of really good colours will last a long time, and will satisfy the eye of the little artists” (1:313). In addition to being worthy of the best, our children also deserve parents who aren’t stressed out over debt or pressure to purchase something that’s just not in the budget. Our Heavenly Father cares about these things and likes it when we bring our concerns to Him. He’ll show you what to do.
Thank you for the tips about switching colors in the Prang set, Nicole. Your reply is much appreciated.